A Beginners Guide to BIOS Legacy Mode, and UEFI Booting
UEFI (Unified Extensible Firmware Interface) is a newer standard that replaces the legacy BIOS. UEFI offers more features and benefits, such as faster boot times, better security, larger disk support, and a graphical user interface. Legacy BIOS is the old mode that uses a 16-bit code and a limited number of options.
Basic UEFI and BIOS are two types of motherboard firmware used during startup to initialize the hardware and load the operating system. They also determine the device boot priority and allow users to customize hardware and software settings. However, UEFI is newer and offers more customization options and features. In this article, you will learn about UEFI and BIOS and how they differ.
What is Thunderbolt BIOS Assist Mode?
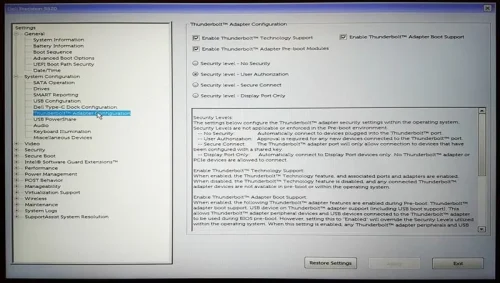
Thunderbolt BIOS Assist Mode is a feature that is related to the Thunderbolt technology and its integration with the computer’s BIOS (Basic Input/Output System). In the BIOS Assisted Mode, the BIOS pre-allocates resources including PCIe and Memory resources for use by the OS to handle adding and removing Thunderbolt devices. This ensures that devices that are added and removed do not negatively impact the system performance or user experience.
When Thunderbolt BIOS Assist Mode is enabled, the BIOS reserves and allocates specific resources for Thunderbolt devices. This allocation helps prevent any negative impact on system performance or user experience when Thunderbolt devices are connected or disconnected.
By pre-allocating resources, Thunderbolt BIOS Assist Mode helps maintain system performance and stability. It ensures that the addition or removal of Thunderbolt devices does not cause any disruptions or slowdowns in the overall system operation.
Thunderbolt BIOS Assist Mode aims to provide a seamless user experience when working with Thunderbolt devices. It helps avoid potential issues that may arise from hot-plugging Thunderbolt devices, such as system crashes or performance degradation.
What Does Bios Mode Do?
BIOS identifies, configures, tests, and connects computer hardware to the OS immediately after a computer is turned on. The combination of these steps is called the boot process. These tasks are each carried out by BIOS’ four main functions: Power-on self-test (POST). It provides a way to configure various hardware and system settings, such as boot order, date and time, device settings, and more.
Here are some key functions and features of BIOS mode:
- Accessing BIOS: Users can access BIOS mode by pressing a specific key during the computer’s startup process. The key to access BIOS mode varies depending on the computer manufacturer, but commonly used keys include Del, F2, F10, or Esc. Upon entering BIOS mode, users are presented with a text-based or graphical interface to navigate and modify settings.
- Hardware Configuration: BIOS mode allows users to configure various hardware settings, such as enabling or disabling specific devices, adjusting memory settings, changing CPU settings, and managing system voltages. Users can also view information about installed hardware components, such as the amount of memory installed or system temperatures.
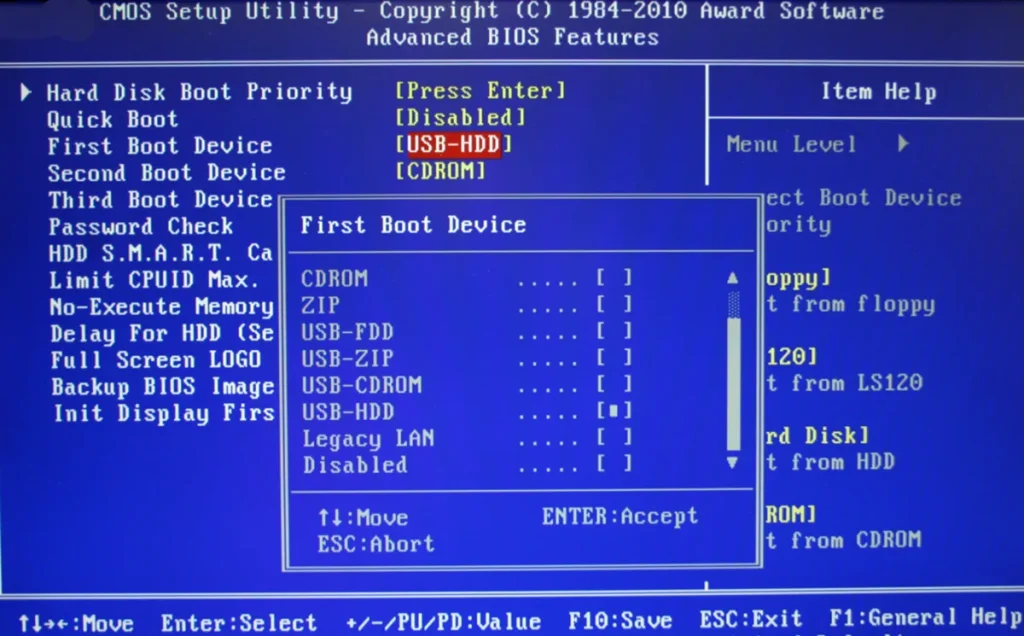
- Boot Order: One important feature of BIOS mode is the ability to change the boot order of devices. Users can specify the order in which the computer searches for an operating system to load. This is useful when booting from different devices, such as a hard drive, USB-related cables and drives, or CD/DVD.
- System Settings: BIOS mode provides access to system settings, including date and time configuration, power button function, ACPI (Advanced Configuration and Power Interface) settings, and more. Users can customize these settings according to their preferences or specific requirements.
- Security: BIOS mode also includes security features, such as setting a BIOS password or enabling secure boot. These features help protect the computer from unauthorized access and ensure the integrity of the system.
Do I Need To Enable Thunderbolt In The Bios?
Yes, in certain cases, you may need to enable Thunderbolt in the BIOS before you can use Thunderbolt 3 hardware. Certain PC systems require that you manually enable Thunderbolt in the BIOS before any Thunderbolt 3 hardware can be used. The steps for entering the BIOS and changing this setting will vary depending on the computer/motherboard manufacturer and the BIOS version.
We suggest referring to your computer or motherboard manual or reaching out to the manufacturer for guidance on adjusting BIOS settings. In certain situations, a BIOS update might be necessary to activate Thunderbolt capabilities before using Thunderbolt 3 hardware. You can usually find BIOS updates on the manufacturer’s website. However, if you’re unsure about updating your BIOS, it’s best to seek assistance from the computer or motherboard manufacturer.
What is UEFI Boot Mode?
UEFI (Unified Extensible Firmware Interface) is a newer standard that replaces the legacy BIOS. UEFI offers more features and benefits, such as faster boot times, better security, larger disk support, and a graphical user interface.
UEFI boot mode refers to the method by which a computer’s firmware, initializes hardware components and launches the operating system during startup. In UEFI boot mode, the system follows the UEFI specification to load and execute the boot loader, operating system kernel, and other necessary components directly from storage devices, such as hard disk drives or solid-state drives.
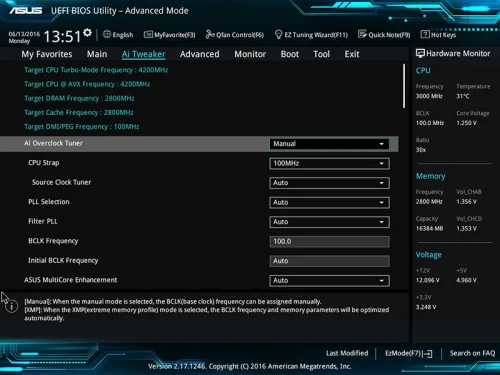
Unlike traditional BIOS, UEFI offers numerous new features and advantages, aiming to eventually replace BIOS altogether. One notable feature is its ability to store initialization and startup information in a .efi file located on a specialized partition known as the EFI System Partition (ESP). This partition also houses boot loader programs for the installed operating system, enabling UEFI to directly boot the OS without undergoing the BIOS self-test process. This streamlined process contributes to faster boot times.
Compared to the traditional BIOS boot mode, UEFI boot mode offers several advantages, including faster startup times, support for larger storage devices and partitions, and more secure booting through features like Secure Boot. Additionally, UEFI boot mode enables advanced functionality, such as support for graphical interfaces during the boot process and the ability to run pre-boot applications and diagnostics
Note: It’s worth noting that while some users may refer to UEFI boot as “BIOS,” most modern PCs today utilize UEFI firmware instead. To differentiate between UEFI and BIOS, some also use terms like “UEFI BIOS” for UEFI firmware and “Legacy BIOS” or “traditional BIOS” for BIOS.
Functions of UEFI Boot Mode:
- UEFI defines a new method for communication between the operating system (OS) and platform firmware. It provides the necessary information to launch the OS boot process efficiently.
- UEFI includes enhanced security features compared to legacy BIOS. It supports features like Secure Boot, which ensures that only trusted software is loaded during the boot process, protecting against malware and unauthorized modifications.
- UEFI supports two booting modes: UEFI mode and legacy BIOS mode. It is generally recommended to install Windows using UEFI mode due to its enhanced security features. However, if you need to boot from a network that only supports BIOS, you may need to switch to legacy BIOS mode.
- UEFI provides firmware menus that allow users to access various settings and options. These menus can be accessed during startup by pressing specific keys, such as Esc, Delete, F1, F2, F10, F11, or F12, depending on the manufacturer. On tablets, common buttons are Volume up or Volume down.
- UEFI allows users to select the boot device or network from the firmware menus. The boot device menu displays options for both UEFI and BIOS modes. Some devices may only support one mode, while others may require manual disabling of UEFI security features to boot in BIOS mode.
- UEFI allows the loading of UEFI driver and UEFI application images, which have access to UEFI-defined runtime and boot services. These images can be loaded from any file on a UEFI-defined file system or through an image-loading service. UEFI images use a modified version of the PE32+ image format and have different subsystem types and machine types.
What Is The Difference Between UEFI And Legacy Bios Mode?
| BIOS | UEFI |
|---|---|
| Runs on Legacy Hardware | Runs on both legacy and newer hardware |
| Only supports DOS and Windows | Supports Windows, Linux, and Mac operating systems |
| Smaller file size and uses less memory | Larger file size and uses more memory but provides more functionality |
| Boots via traditional method from MBR | Boots via modern method from GPT partition |
| Limited to 2TB storage support | Supports storage devices larger than 2TB |
| Fixed 16-bit architecture | Moder 64-bit architecture that is upgradeable |
| Can only address lower memory | Supports High-resolution graphics and inputs |
| Firmware cannot be updated without a flash ROM chip | Firmware updates are easy and don’t require flash ROM chip replacement |
| Limitations in booting from external devices | Better support for booting from external devices like USB, SD cards, etc |
How Do I Change Thunderbolt Settings In BIOS?
Changing Thunderbolt settings in the BIOS is a pretty straightforward process. here’s a general guide on how to do it:
- Step 1: Access BIOS
Restart your computer and enter the BIOS setup utility. This is typically done by pressing a specific key during the boot process, such as F2, Del, Esc, or F10. The correct key should be displayed on your screen during startup. - Step 2:Navigate to Thunderbolt Settings
Once you’re in the BIOS setup utility, navigate through the menus using the arrow keys on your keyboard. Look for a section related to “Advanced” or “Peripheral Configuration” settings. - Step 3: Locate Thunderbolt Configuration
Within the advanced settings, there should be an option for Thunderbolt configuration. It may be labeled as “Thunderbolt Configuration,” “Thunderbolt Security,” or something similar. - Step 4: Adjust Thunderbolt Settings
Enter the Thunderbolt configuration menu and you should see various options related to Thunderbolt ports, security features, and device settings. Depending on your needs, you can adjust settings such as Thunderbolt security levels, port configurations, and device enumeration. - Step 5: Save and Exit
After making your desired changes, navigate to the option to save your settings and exit the BIOS setup utility. This is typically done by selecting “Save Changes and Exit” or a similar option. Confirm your selection and your computer will reboot with the new Thunderbolt settings applied.
How To Unlock Advanced Settings In BIOS?
To unlock advanced settings in the BIOS, you need to keep in mind that the availability of advanced settings can vary depending on the manufacturer and model of your computer. Here are some general steps you can try:
- Step 1: Restart your computer and access the BIOS settings. The key to enter the BIOS can vary, but common keys include F2, Del, Esc, or F10. Check your computer’s documentation or look for on-screen prompts during startup to determine the correct key.
- Step 2: Once you are in the BIOS settings, navigate to the “Security” or “Advanced” section. The location of advanced settings may vary depending on your BIOS version and manufacturer.
- Step 3: Look for an option related to “BIOS Lock” or “Advanced Settings Lock.” This option may be labeled differently, but it is typically used to restrict access to advanced settings.
- Step 4: If the “BIOS Lock” or “Advanced Settings Lock” option is enabled, you will need to disable it to unlock the advanced settings. This may involve entering a password or a specific key combination. Refer to your computer’s documentation or contact the manufacturer for instructions on how to disable the lock.
- Step 5: Save your changes and exit the BIOS settings. Press the appropriate key (usually F10) to save the changes and restart your computer.
If this method does not work for you then I will suggest you try these possible ways as well;
- Boot up your computer. When you see the startup logo screen, press CTRL+F10 and then CTRL+F11 to get into the BIOS. (It only works for some computers and you may need to try it a few times until you get in).
- Boot up your computer and then press the F8, F9, F10, or Del keys to get into BIOS. Then quickly press the A key to show the Advanced settings.
- In the BIOS, press Fn+Tab for 3 times.
If none of the 3 ways, the Advanced settings are set to lock on your computer by your manufacturer and there is no way to unlock it.
Note: It’s important to note that not all computers allow users to unlock advanced settings in the BIOS. Some manufacturers may restrict access to advanced settings to prevent users from making changes that could potentially damage the system. If you are unable to find the option to unlock advanced settings in your BIOS, likely, that your computer does not support it.
BIOS and UEFI perform similar functions in a computer, although how they work behind the scenes is vastly different. While the newer standard is certainly the better option for modern devices, there’s no way to update your legacy motherboard to UEFI in case you’re wondering. The only way to switch to the newer technology would be a hardware upgrade. So are you running a new system with UEFI or a legacy motherboard with BIOS firmware?
What is the difference between BIOS and UEFI?
The main difference between UEFI and BIOS lies in their architecture and capabilities. While BIOS uses 16-bit mode and has a limited user interface, UEFI uses 32-bit or 64-bit mode and offers a more advanced graphical user interface.
What is the difference between UEFI and Legacy BIOS?
UEFI is a 32-bit or 64-bit program that is written in the C language. UEFI is not limited to real mode and provides more addressable address space. Legacy BIOS is a 16-bit program assembly language that can run only in 16-bit real mode and provides only 1 MB of addressable memory.
Is It Safe To Change Bios Mode?
Modifying BIOS settings can be risky, so always exercise caution. Incorrectly changing settings can cause the computer to not start, and some changes might damage the motherboard. It’s best to have some technical know-how before making BIOS changes. Here are some factors to consider when changing the BIOS mode:
- Compatibility:
Ensure that your hardware and operating system support the desired BIOS mode. For example, if you want to switch from Legacy BIOS mode to UEFI mode, you need to verify that your hardware and operating system are compatible with UEFI. - Backup:
Before making any changes to the BIOS mode, it is highly recommended to create a backup of your important data. This will help you recover in case any issues arise during the process. - Manufacturer Guidelines:
Different computer manufacturers may have specific instructions or recommendations for changing the BIOS mode. It is advisable to consult the documentation or support resources provided by your computer manufacturer for accurate and detailed instructions. - BIOS Update:
In some cases, changing the BIOS mode may require updating the BIOS firmware. It is crucial to follow the manufacturer’s instructions carefully when performing a BIOS update to avoid any potential risks.
Am I on UEFI or BIOS?
On the System Details page, select the Drive Encryption tab. Click More to see the firmware type. The firmware type will be either in BIOS or EFI (UEFI).
Why BIOS is better than UEFI?
Legacy BIOS mode is compatible with older hardware and operating systems that may not support UEFI. If you’re using older hardware or need to run older software that doesn’t support UEFI, legacy mode may be necessary. Legacy BIOS is generally considered more straightforward.
Why is UEFI called BIOS?
Unified Extensible Firmware Interface (UEFI) is a specification for a software program that connects a computer’s firmware to its operating system (OS). UEFI is expected to eventually replace basic input/output system (BIOS) but is compatible with it.
Which is faster legacy or UEFI?
UEFI mode is a newer and more advanced firmware interface that replaces the legacy BIOS (Basic Input/Output System). It allows for faster boot times, more secure boot processes, and support for larger disk sizes.
How to check BIOS?
- There is a sticker on the BIOS chipset, which contains the default BIOS version. …
- When your computer is starting up, press F2 to enter the BIOS setup. …
- In Windows OS, you can use system detection software such as CPU-Z to check the BIOS version.
Share This Artcle:

Fast delivery
Fastest delivery within 22 days

Quick proofing
Fastest 3-day proofing cycle

After-sale protection
24-month long warranty

1V1Customer Service
Professional customer service follow-up

